Deployment Wizard Guide
This guide walks you through each step of the deployment wizard in detail.
Overview
The deployment wizard is a step-by-step process that guides you through deploying a NexusAI capability to your AWS environment. The wizard handles all the complexity of infrastructure provisioning while giving you full visibility into the process.
Step 1: Capability Selection
What You'll See
The capability selection screen shows two sections:

Installed Capabilities (green border) - Capabilities already deployed to your environment - Shows deployment status, environment, and region - Actions: Update or Delete
Available Capabilities (blue border) - Capabilities ready to be installed - Shows name, version, description, and estimated deployment time - Action: Install
Available Capabilities
| Capability | Description | Est. Time |
|---|---|---|
| Call Processing | Process voice calls with AI routing | ~15 min |
| Billing Engine | Real-time billing and charging | ~20 min |
| Customer Portal | Self-service customer management | ~15 min |
Actions
| Action | Description |
|---|---|
| Install | Deploy a new capability |
| Update | Update an existing deployment |
| Delete | Remove a deployed capability |
| Refresh | Reload capability and deployment status |
Tips
- Click Refresh to reload capability and deployment status
- Installed capabilities show their active environments
- You can install the same capability to multiple environments
Step 2: Architecture Selection
What You'll See
Choose your preferred deployment architecture for both frontend and backend:
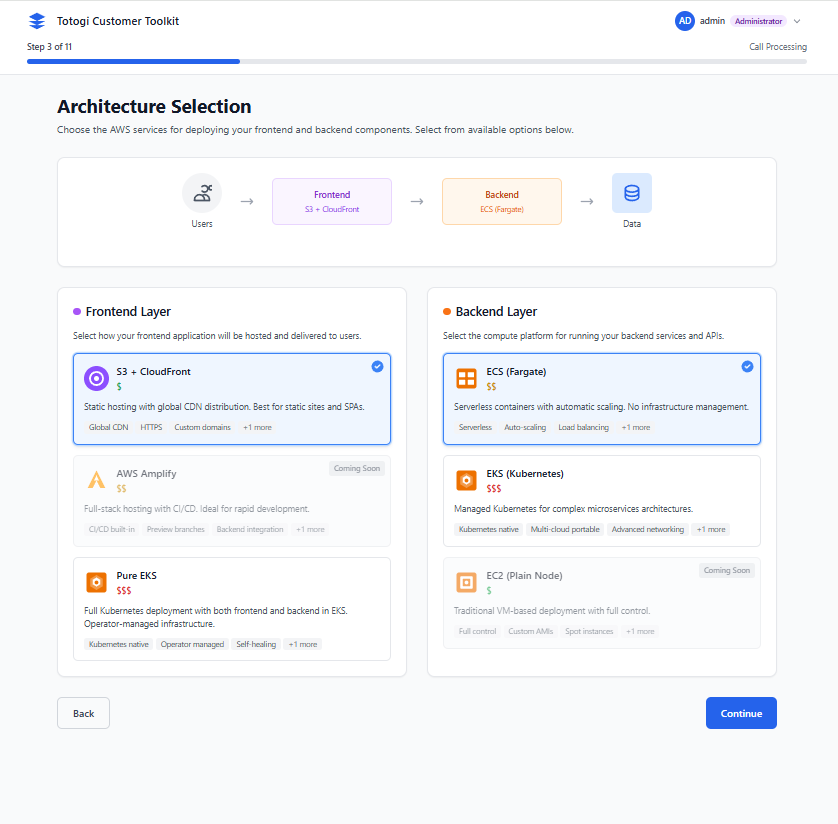
Frontend Options
| Option | Description | Cost Estimate |
|---|---|---|
| CloudFront + S3 (Recommended) | Static hosting with global CDN | $5-50/month |
| AWS Amplify | Managed hosting with CI/CD | $15-100/month |
| Skip Frontend | Deploy backend only | - |
Backend Options
| Option | Description | Cost Estimate |
|---|---|---|
| ECS Fargate (Recommended) | Serverless containers, auto-scaling | $50-500/month |
| EKS (Kubernetes) | Kubernetes Operator deployment | $150-1000/month |
| EC2 Instances | Traditional VMs | $30-300/month |
| Skip Backend | Deploy frontend only | - |
EKS (Kubernetes) Option - NEW
When selecting EKS (Kubernetes), the deployment uses the Nexus Kubernetes Operator:
| Feature | What It Does |
|---|---|
| Custom Resources | Deploy using NexusAICapability CRDs |
| Auto AWS Provisioning | Creates DynamoDB tables, S3 buckets, Glue databases |
| IRSA | Secure IAM Roles for Service Accounts |
| LoadBalancers | Automatic service exposure via AWS ALB/NLB |
| Lifecycle Management | Handles updates, scaling, and cleanup |
Prerequisites for EKS: - Existing EKS cluster (version 1.23 or higher) - OIDC provider configured on the cluster - kubectl configured with cluster access - Node groups with available capacity
When to Choose EKS: | ECS Fargate | EKS (Kubernetes) | |-------------|------------------| | Quick setup, no cluster needed | Existing EKS cluster available | | Serverless, pay-per-use | Full Kubernetes control | | Managed infrastructure | Custom K8s configurations | | Simple deployments | Cloud-native team experience |
See Kubernetes Deployment Guide for detailed EKS setup.
Recommendations
- CloudFront + S3 is recommended for frontend - provides global CDN with low latency
- ECS Fargate is recommended for backend if you want quick serverless setup
- EKS (Kubernetes) is recommended if you have an existing EKS cluster and prefer Kubernetes-native operations
Tips
- At least one option (frontend or backend) must be selected
- Cost estimates vary based on traffic and usage
- Production environments typically cost more due to redundancy
- EKS costs include cluster management fee ($0.10/hour) plus node costs
Step 3: Environment Configuration
What You'll See
Configure your deployment environment settings:
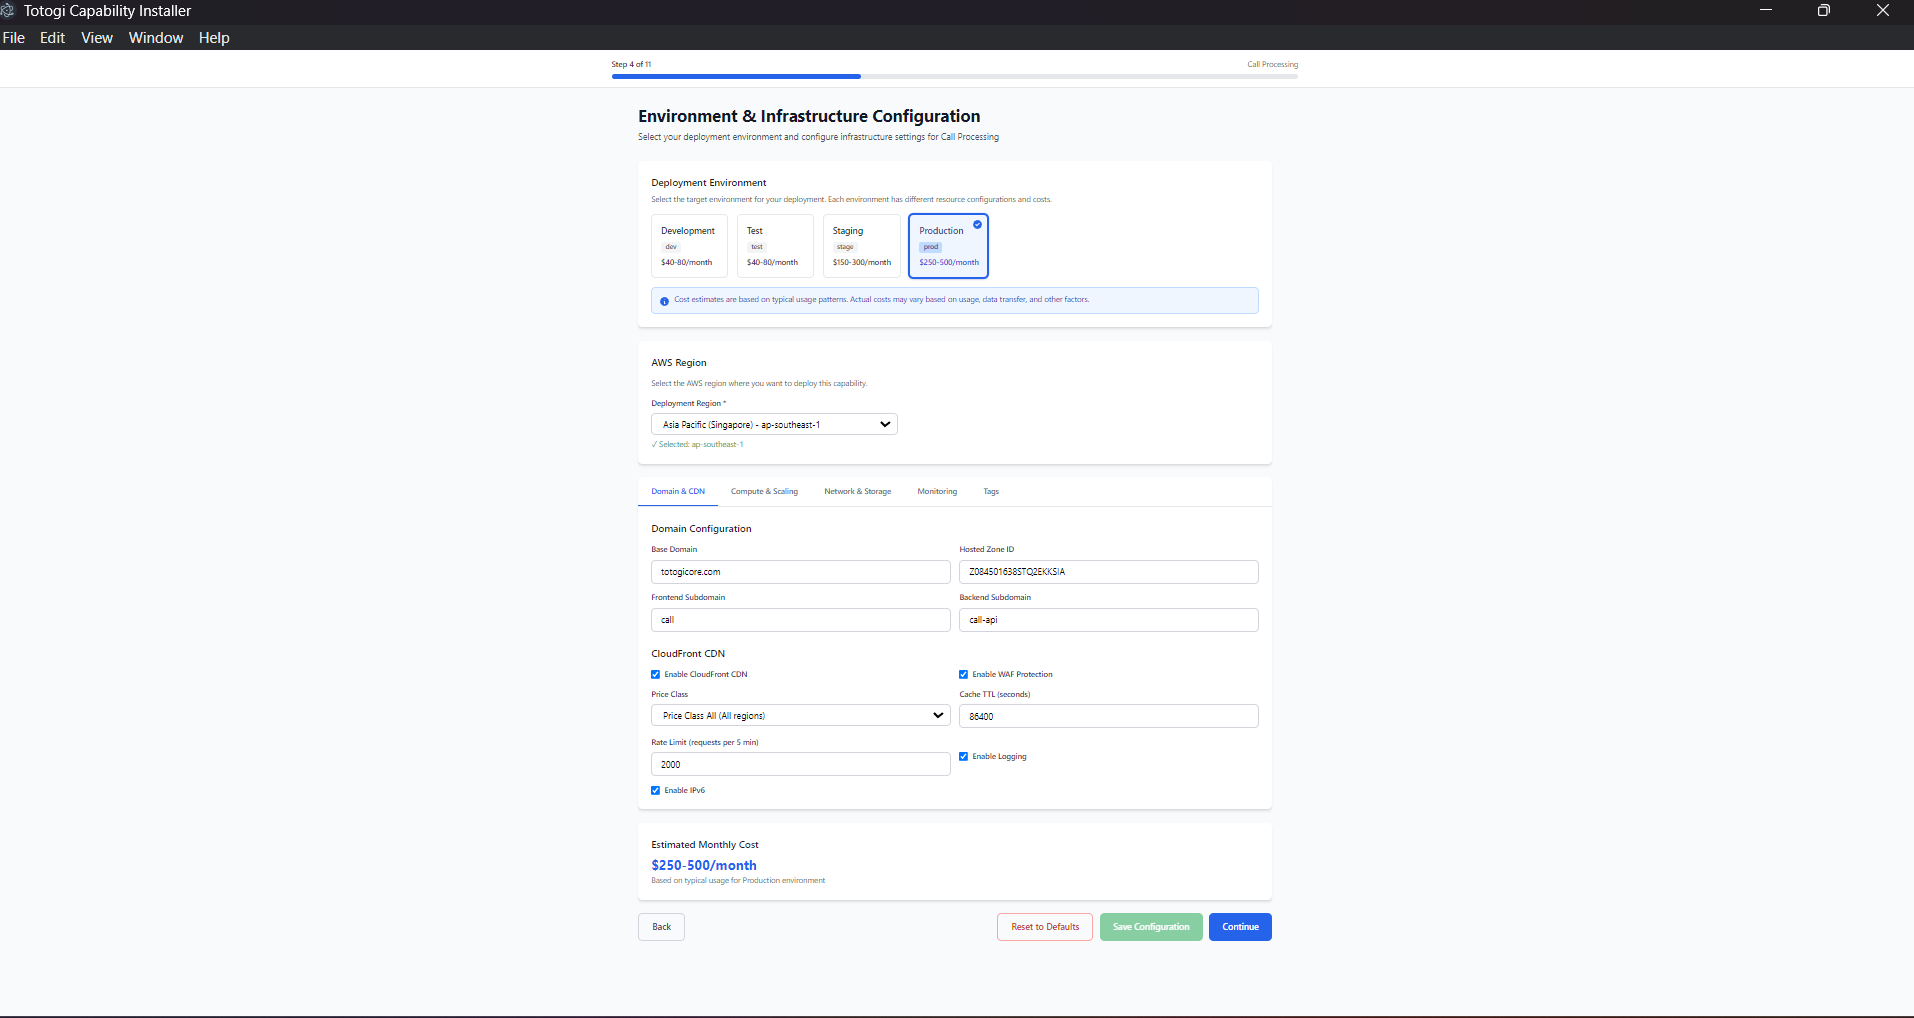
Environment Selection
| Environment | Purpose | Characteristics |
|---|---|---|
| dev | Development | Lower resources, faster iteration |
| staging | Pre-production testing | Production-like, isolated |
| prod | Production | Full resources, high availability |
Domain Configuration
Configure your domain settings:
| Field | Example | Description |
|---|---|---|
| Base Domain | example.com |
Your registered domain |
| Frontend Subdomain | app |
Creates app.example.com |
| Backend Subdomain | api |
Creates api.example.com |
| Route53 Hosted Zone ID | Z1234567890ABC |
Your Route53 zone |
AWS Region Selection
Choose your deployment region based on: - Latency - Select region closest to your users - Compliance - Some data must stay in specific regions - Cost - Pricing varies by region - Services - Some services have regional availability
Popular Regions:
- us-east-1 - N. Virginia (most services, lowest cost)
- us-west-2 - Oregon
- eu-west-1 - Ireland
- ap-southeast-1 - Singapore
Tips
- Use consistent naming across environments
- Ensure your domain is registered and Route53 hosted zone exists
- Consider data residency requirements when selecting region
Step 4: AWS Configuration
What You'll See
Enter and validate your AWS credentials:
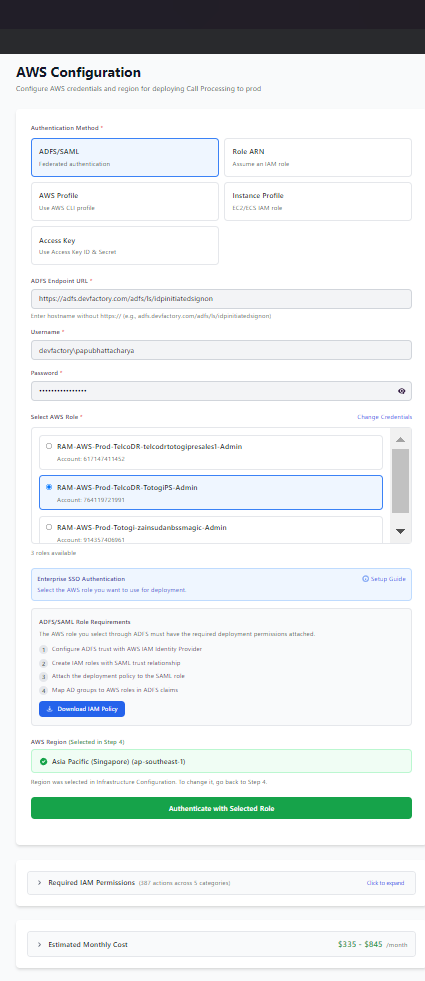
Authentication Methods
1. IAM Role ARN (Recommended)
Best for cross-account deployments and security best practices.
Required Information:
- Role ARN: arn:aws:iam::123456789012:role/DeploymentRole
- Source credentials to assume the role
Source Credential Options: - Access Keys - IAM user credentials - AWS Profile - CLI profile - Instance Profile - EC2/ECS role - Environment - Environment variables
2. AWS Access Keys
Direct authentication using IAM user credentials.
Required Information:
- Access Key ID: AKIAIOSFODNN7EXAMPLE
- Secret Access Key: wJalrXUtnFEMI/K7MDENG/bPxRfiCYEXAMPLEKEY
3. AWS CLI Profile
Use credentials from your AWS CLI configuration.
Required Information:
- Profile name from ~/.aws/credentials
4. ADFS/SAML
Enterprise SSO authentication.
Required Information: - ADFS URL - Username - Password - Select role from available roles
Validation
Click Test Credentials to validate: - ✅ AWS account access - ✅ STS identity verification - ✅ Account ID confirmation
Tips
- IAM Role ARN is most secure for production
- Never share or commit access keys
- Use MFA when possible
- Rotate credentials regularly
Step 5: Permission Verification
What You'll See
The installer verifies all prerequisites before deployment:
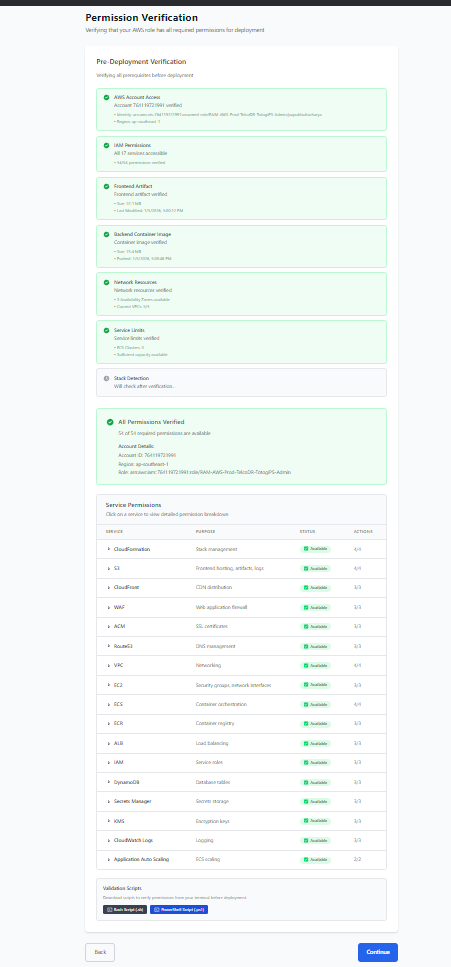
Verification Checks
| Check | Description |
|---|---|
| AWS Account Access | Verify STS identity |
| IAM Permissions | Test required AWS service permissions |
| Frontend Artifact | Verify S3 artifact exists |
| Backend Image | Verify ECR container image exists |
| Network Resources | Check availability zones and VPCs |
| Service Limits | Verify ECS capacity |
Status Indicators
| Icon | Status | Meaning |
|---|---|---|
| ⏳ | Checking | Verification in progress |
| ✅ | Passed | Check successful |
| ❌ | Failed | Check failed (see details) |
| ⚠️ | Warning | Non-blocking issue |
Handling Failures
If a check fails: 1. Review the error message 2. Click "View Details" for more information 3. Fix the issue in AWS Console 4. Click Re-verify to check again
Tips
- All checks must pass before deployment
- Permission issues are the most common failure
- Use the IAM Setup Guide for policy templates
Step 6: Strategy Selection
When This Appears
Strategy selection appears when: - Updating an existing deployment - Previous deployment exists in target environment - Stacks are in various states
Deployment Strategies
| Strategy | When to Use | Impact |
|---|---|---|
| Update Existing | Stacks are healthy | Minimal downtime |
| Clean Deploy | Stacks are in failed state | Full recreation |
| Manual Recovery | Specific stack issues | Targeted fix |
Stack States
| State | Can Update? | Recommended Action |
|---|---|---|
CREATE_COMPLETE |
✅ Yes | Update Existing |
UPDATE_COMPLETE |
✅ Yes | Update Existing |
ROLLBACK_COMPLETE |
❌ No | Clean Deploy |
UPDATE_ROLLBACK_COMPLETE |
❌ No | Clean Deploy |
DELETE_FAILED |
❌ No | Manual cleanup |
Tips
- Update Existing preserves data and minimizes downtime
- Clean Deploy is safest for failed states but causes downtime
- Always backup important data before Clean Deploy
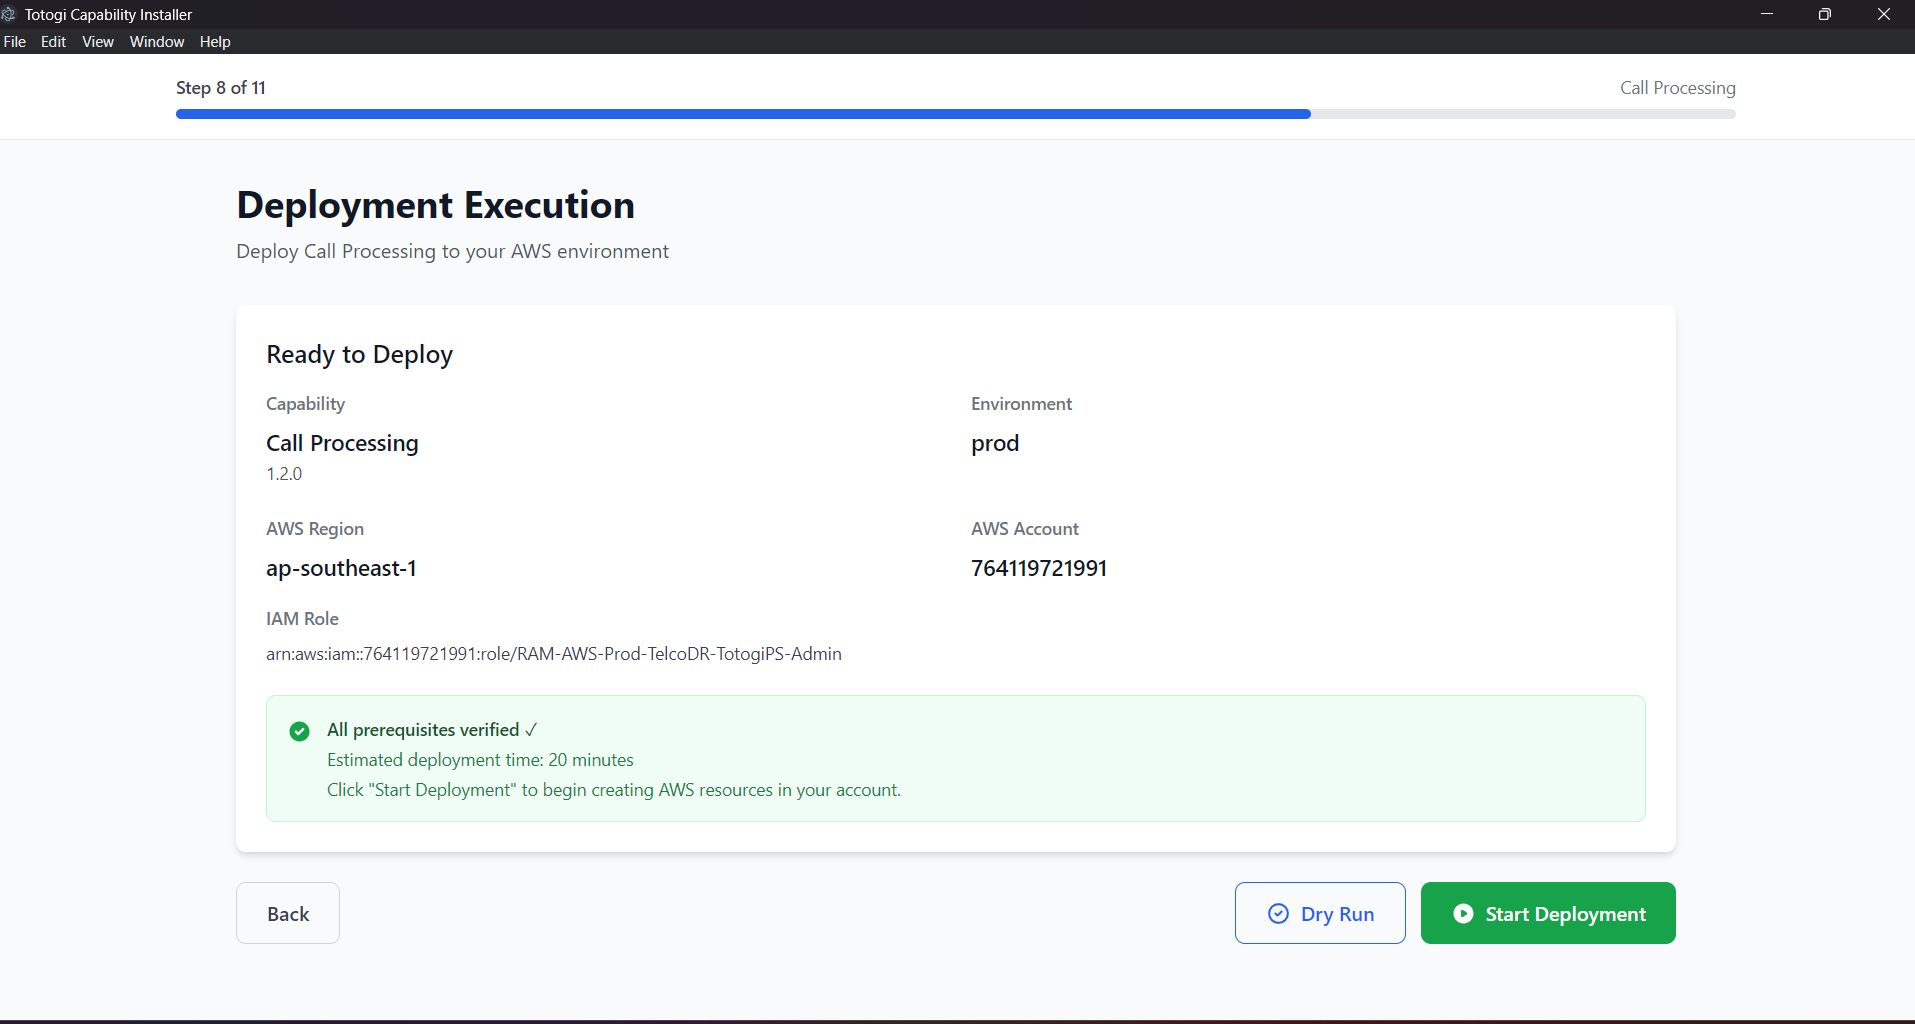
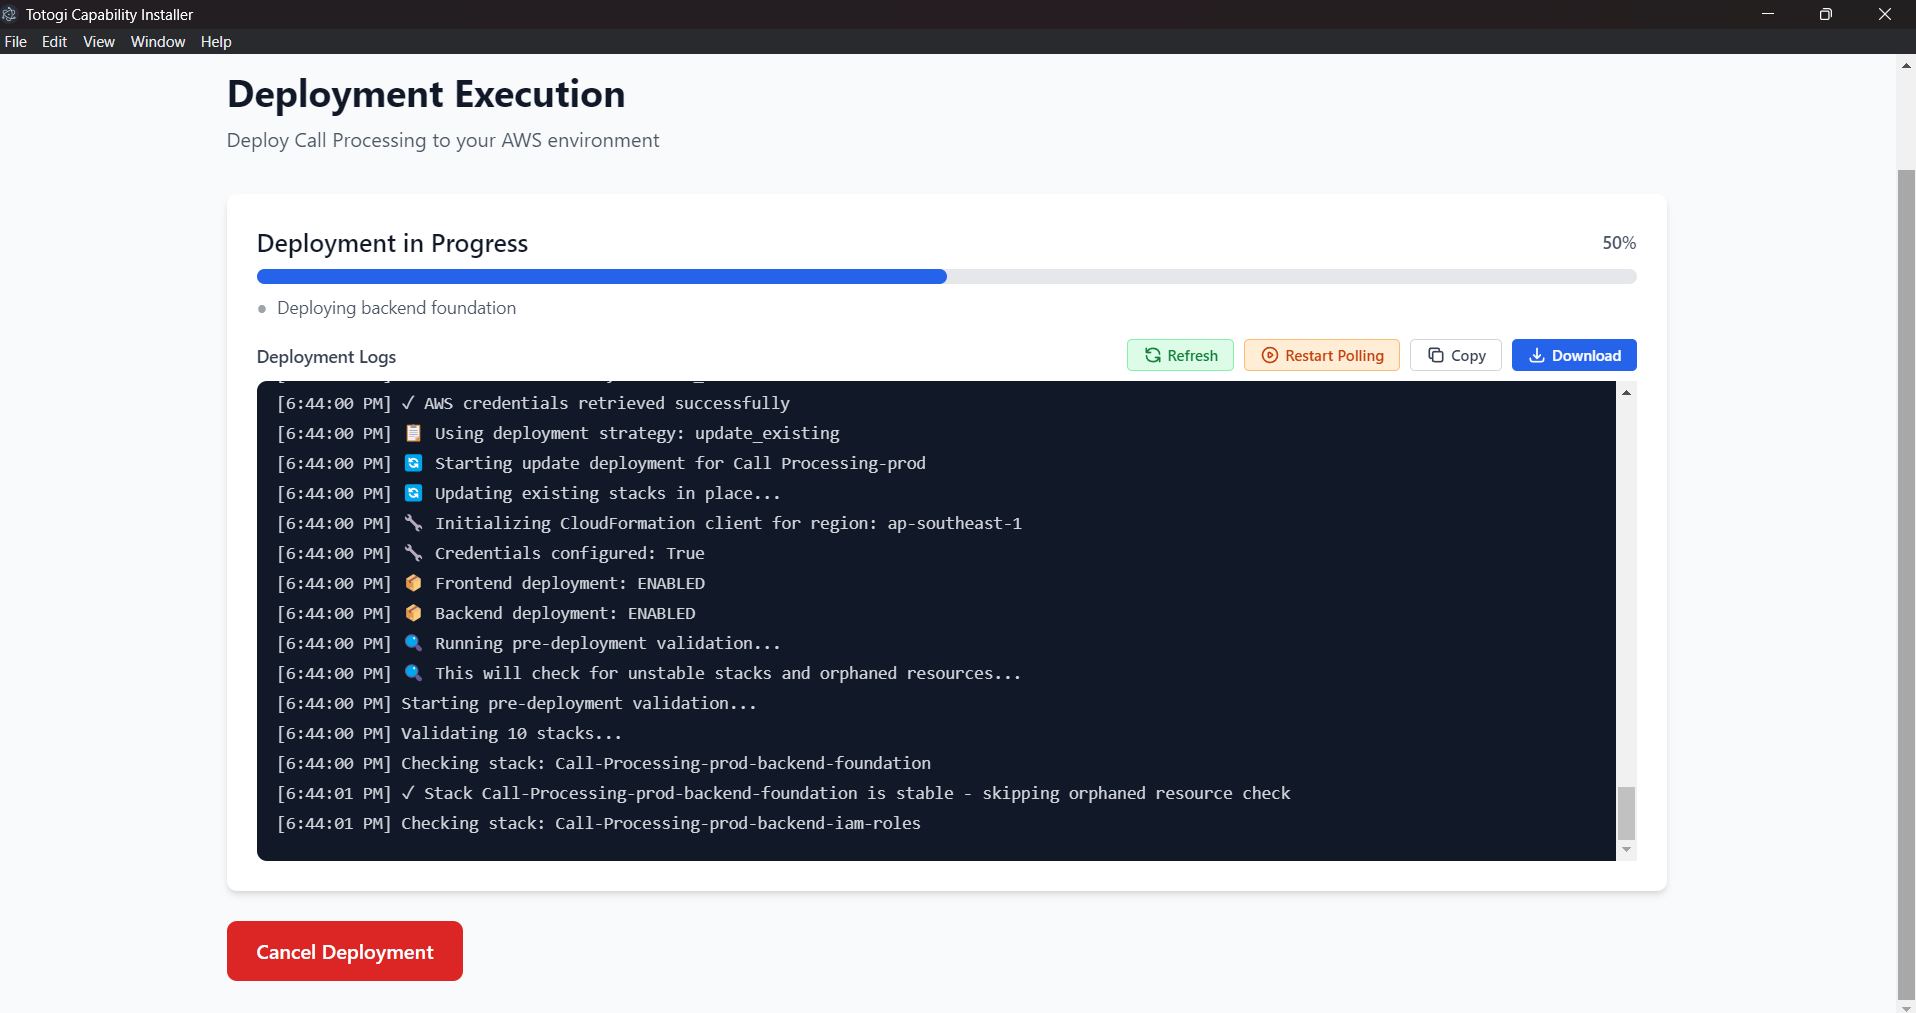
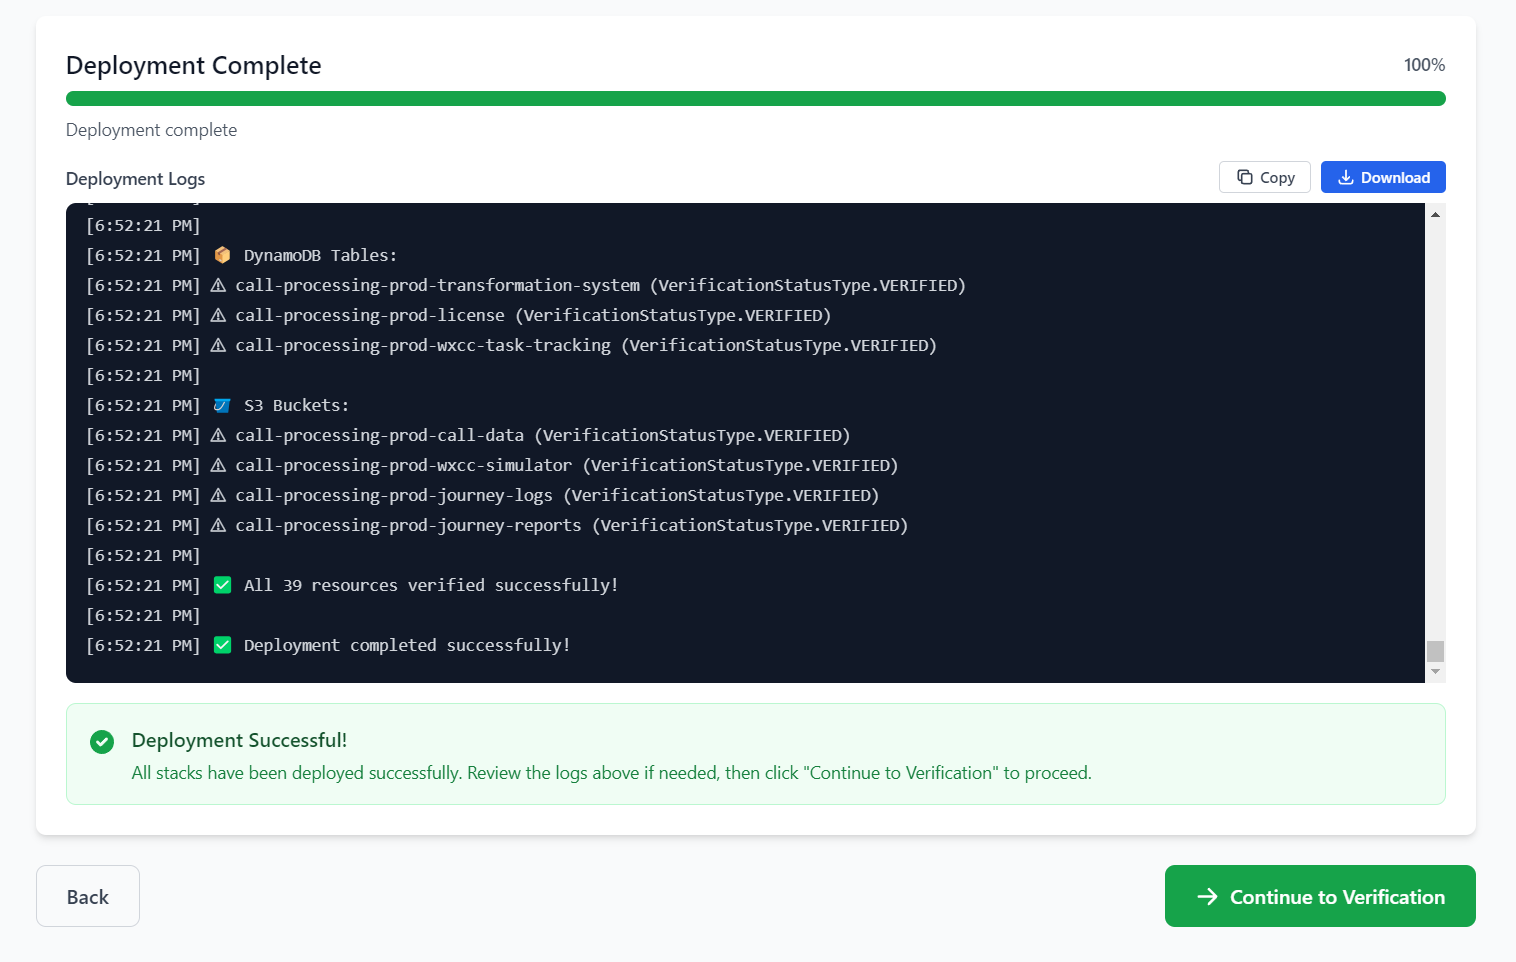
Step 7: Deployment Execution
What You'll See
Monitor your deployment progress in real-time:

Pre-Deployment Summary
Review before starting: - Capability name and version - Target environment and region - AWS account ID - Estimated deployment time
Progress Tracking
Progress Bar - Shows overall completion percentage - Color indicates status (blue=progress, green=success, red=error)
Current Stage - Displays current deployment stage - Updates in real-time
Live Logs
- Terminal-style log viewer
- Auto-scrolls to latest entries
- Timestamped entries
Deployment Stages
 5% - Initialization
15% - Starting Deployment
30% - Frontend Global (CloudFront, S3, ACM, WAF)
45% - Frontend Cognito (User Pool, Auth)
60% - Frontend Regional (Route53, Regional)
70% - Frontend Upload (Artifacts, Cache)
40% - Backend Foundation (VPC, IAM, Certs)
55% - Backend Storage (ECR, DynamoDB, S3)
70% - Backend Network (ALB, Security Groups)
85% - Backend Service (ECS, Auto-scaling)
95% - Verification (Health Checks)
100% - Complete!
Actions During Deployment
| Action | Description |
|---|---|
| Refresh | Manually refresh logs |
| Restart Polling | Restart auto-refresh |
| Copy Logs | Copy logs to clipboard |
| Download Logs | Save logs to file |
| Cancel | Cancel deployment (with confirmation) |
Tips
- Deployment typically takes 15-30 minutes
- Don't close the application during deployment
- Logs are saved automatically for troubleshooting
Step 8: Post Verification
What You'll See
After deployment, the installer verifies service health:
Health Checks
| Check | Description |
|---|---|
| Frontend Availability | Application loads correctly |
| Authentication Service | Cognito responds |
| Backend API | API health endpoint responds |
| Database Connectivity | DynamoDB accessible |
| SSL Certificates | HTTPS working correctly |
Status Indicators
| Status | Meaning |
|---|---|
| ✅ Healthy | Service is operational |
| ⚠️ Degraded | Service has issues |
| ❌ Unhealthy | Service is down |
Tips
- All services should show healthy
- DNS propagation may take a few minutes
- SSL certificates may take up to 30 minutes to validate
Step 9: Results
What You'll See
Upon successful deployment, you receive all deployment outputs:
Deployment Outputs
| Output | Description |
|---|---|
| Frontend URL | Your application URL |
| Backend API URL | API endpoint |
| Cognito User Pool ID | Authentication pool |
| AWS Region | Deployment region |
Admin Credentials
First-Time Login:
- Admin email: admin@capability-name.local
- Temporary password: Displayed on screen
Important: Change password on first login!
Next Steps
- Access Application - Open frontend URL
- Login - Use admin credentials
- Change Password - Set new secure password
- Create Users - Add additional users in Cognito
Actions
| Button | Action |
|---|---|
| View Dashboard | Open management dashboard |
| New Deployment | Start another deployment |
| Copy | Copy values to clipboard |
Wizard Navigation
Progress Bar
- Shows current step and total steps
- Click to see step name
Navigation Buttons
| Button | Action |
|---|---|
| Back | Return to previous step |
| Next | Proceed to next step |
| Cancel | Exit wizard (with confirmation) |
Tips
- Progress is saved between steps
- You can go back to modify settings
- Canceling during deployment requires confirmation
Next Steps
- AWS Configuration - Detailed AWS setup
- Managing Deployments - Update and delete deployments
- Troubleshooting - Common issues and solutions