Getting Started
This guide will help you get up and running with the NexusAI Deployer.
Overview
The NexusAI Deployer is a desktop application that deploys NexusAI capabilities to your AWS environment. The deployment process is guided by a step-by-step wizard that handles all the complexity of AWS infrastructure provisioning.
Before You Begin
Prerequisites
Before using the installer, ensure you have:
- AWS Account with administrative access or appropriate IAM permissions
- AWS Credentials using one of the supported authentication methods:
- IAM Role ARN (recommended for cross-account deployments)
- AWS Access Keys
- AWS CLI Profile
- ADFS/SAML authentication
- Network Access to AWS APIs from your workstation
Required AWS Permissions
The deployment process requires permissions to create and manage:
- CloudFormation stacks
- IAM roles and policies
- VPC and networking resources
- ECS/Fargate services (for ECS deployments)
- EKS cluster access (for Kubernetes deployments)
- S3 buckets
- DynamoDB tables
- CloudFront distributions
- Route53 DNS records
- ACM certificates
- WAF rules
- CloudWatch logs and alarms
Additional requirements for EKS (Kubernetes) deployments:
- eks:DescribeCluster and eks:ListClusters permissions
- Kubernetes API access to the target cluster
- ECR pull permissions for container images
See AWS Configuration for detailed IAM policy requirements.
Application Overview
Main Screen
When you launch the application, you'll see the Welcome screen:
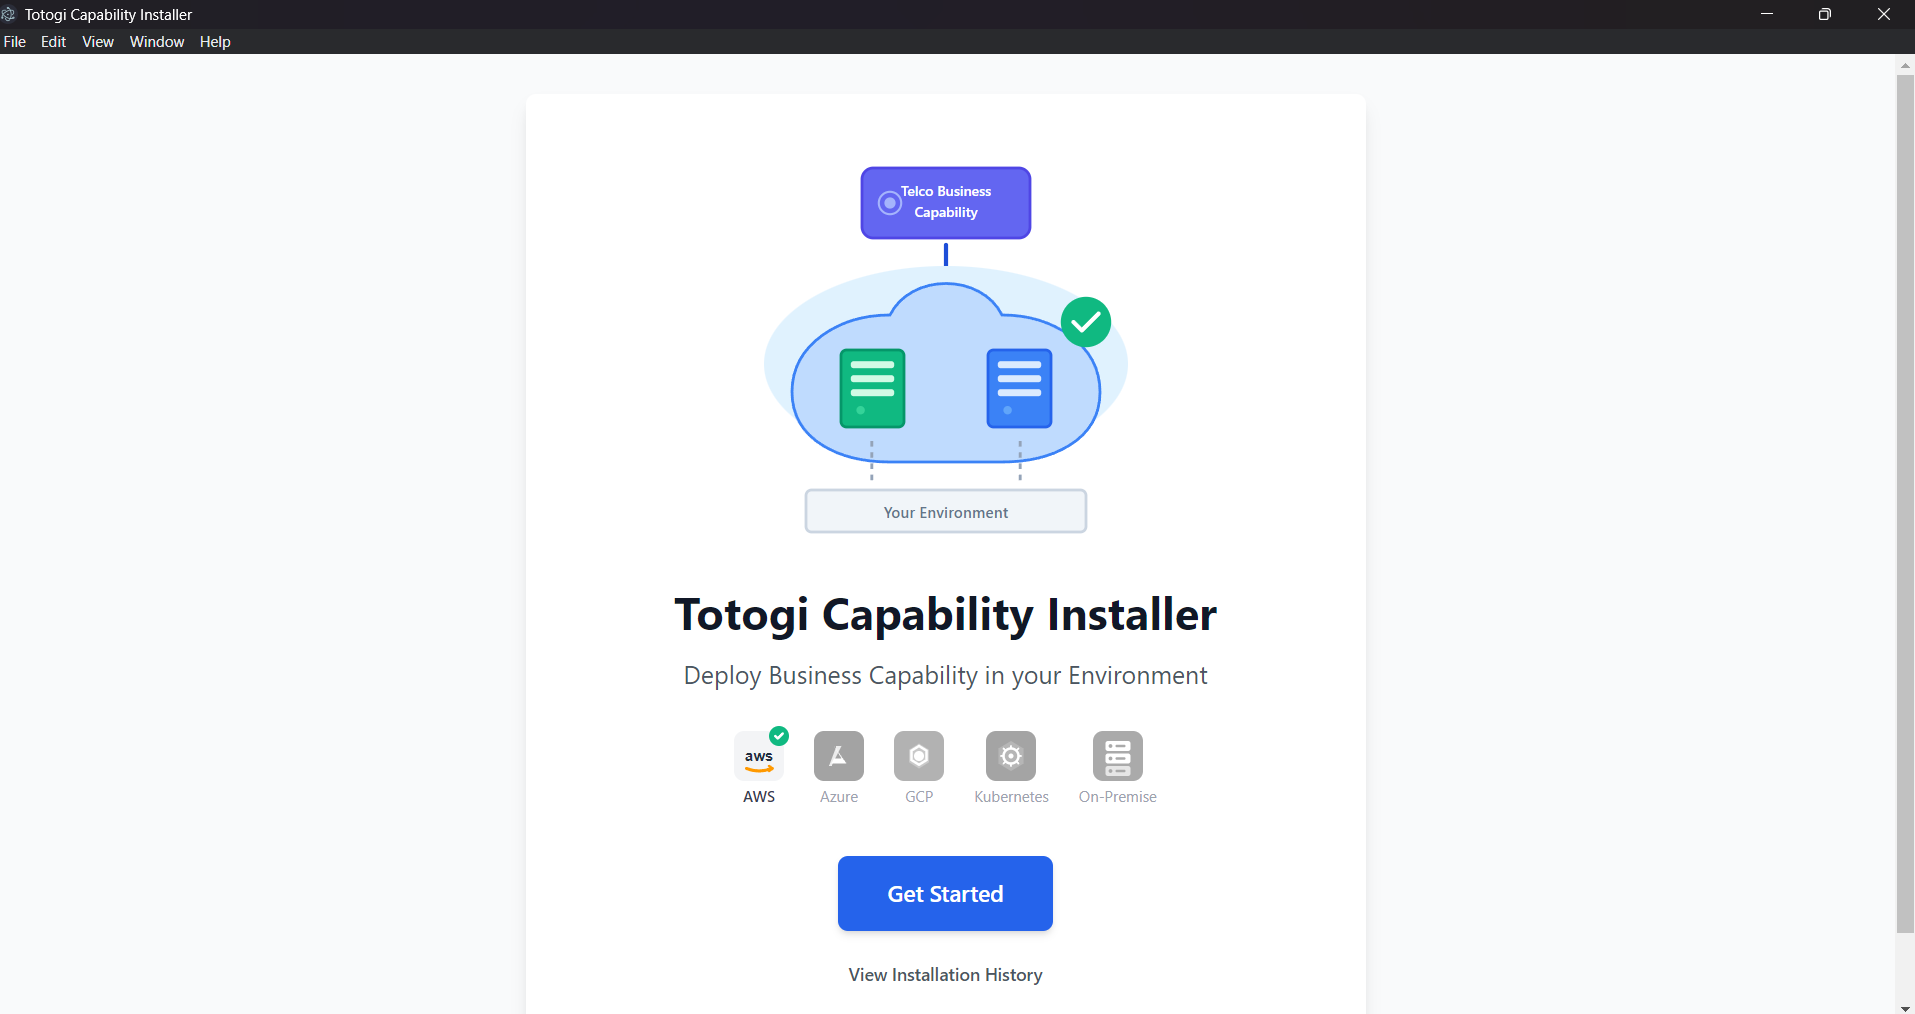
The home screen provides:
- Hero illustration showing the deployment concept
- Platform icons indicating supported cloud providers
- Get Started button to begin the deployment wizard
- View Installation History to see past deployments
Deployment Wizard Steps
The wizard guides you through these steps:
| Step | Description | Screenshot |
|---|---|---|
| 1. Capability Selection | Choose which capability to deploy | View |
| 2. Architecture Selection | Select frontend and backend deployment options | View |
| 3. Environment Configuration | Configure domain, region, and environment settings | View |
| 4. AWS Configuration | Enter and validate AWS credentials | View |
| 5. Permission Verification | Verify AWS permissions and prerequisites | View |
| 6. Strategy Selection | Choose deployment strategy (for updates) | - |
| 7. Deployment Execution | Monitor real-time deployment progress | View |
| 8. Post Verification | Verify deployed resources are healthy | - |
| 9. Results | View deployment outputs and next steps | View |
Quick Start Guide
Step 1: Launch the Application
Double-click the NexusAI Installer icon to launch the application. You will see the welcome screen:
Step 2: Click "Get Started"
On the welcome screen, click the Get Started button to begin the deployment wizard.
Step 3: Select a Capability
Browse the available capabilities and click Install on the one you want to deploy.

The capability selection screen shows: - Installed Capabilities (green section) - Already deployed to your environment - Available Capabilities (blue section) - Ready for installation
Step 4: Choose Architecture
Select your preferred deployment architecture:
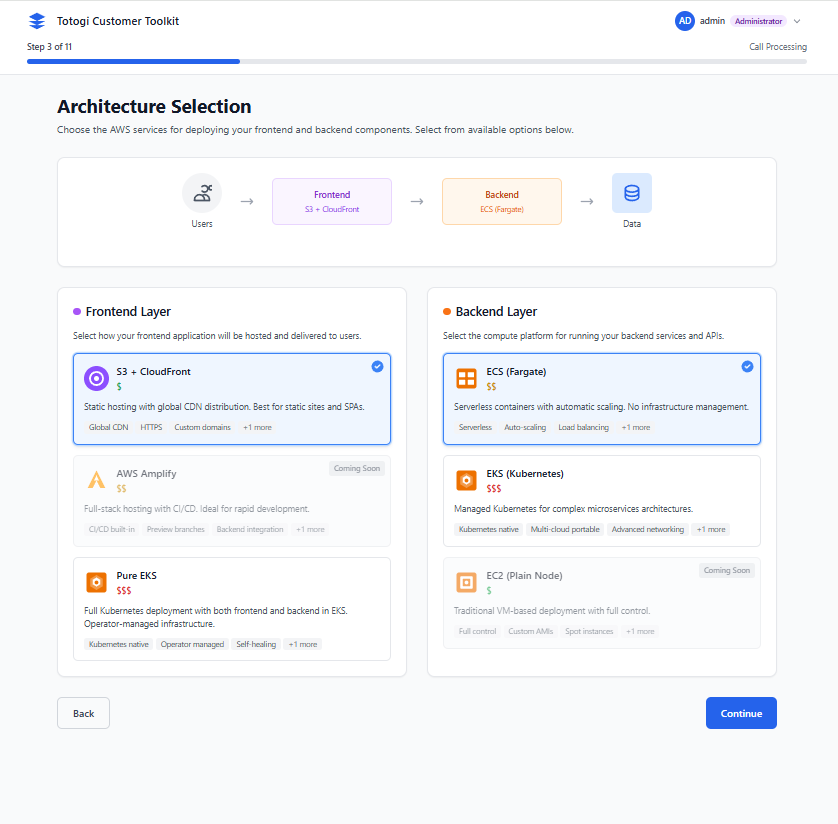
Recommended Configuration: - Frontend: CloudFront + S3 (recommended) - Backend: ECS Fargate (recommended)
Step 5: Configure Environment
Enter your deployment configuration:
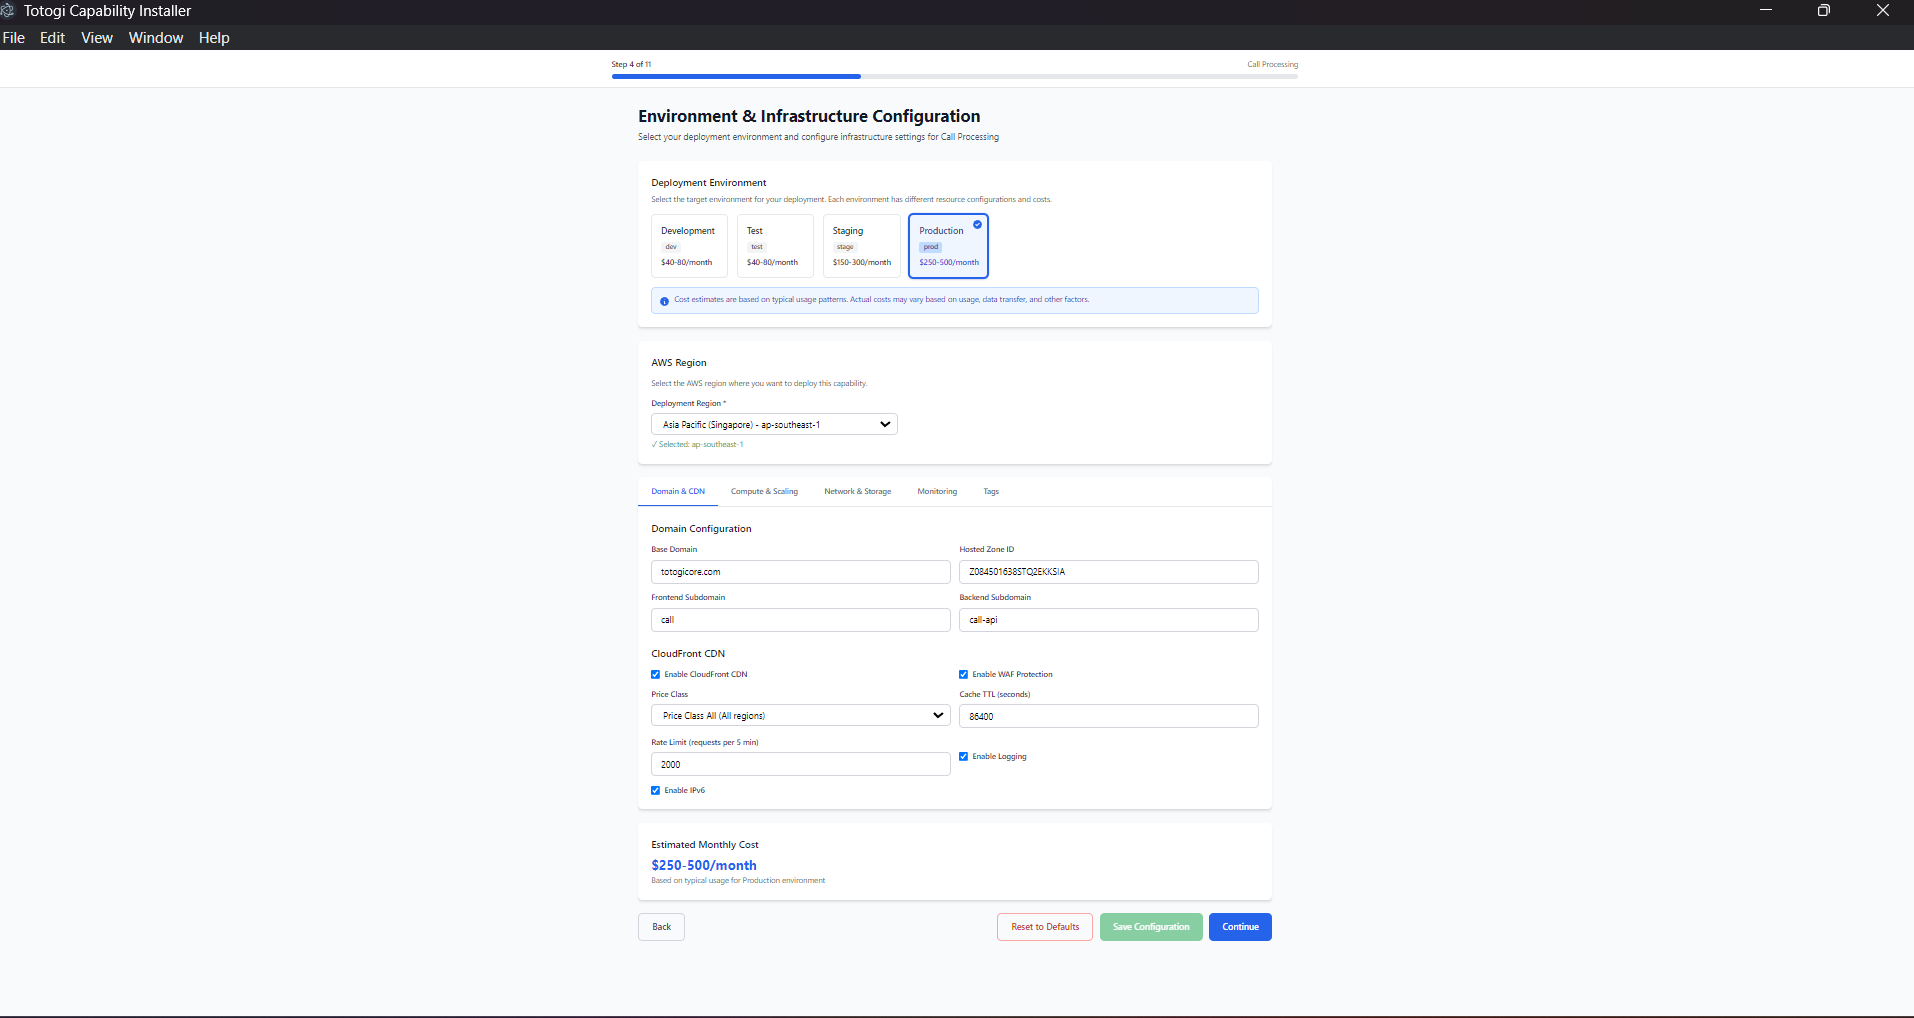
Configure the following: - Environment: dev, staging, or prod - AWS Region: Your target AWS region - Domain Settings: Your domain name and subdomains - Route53 Hosted Zone ID: Your DNS zone identifier
Step 6: Enter AWS Credentials
Choose your authentication method and enter credentials:
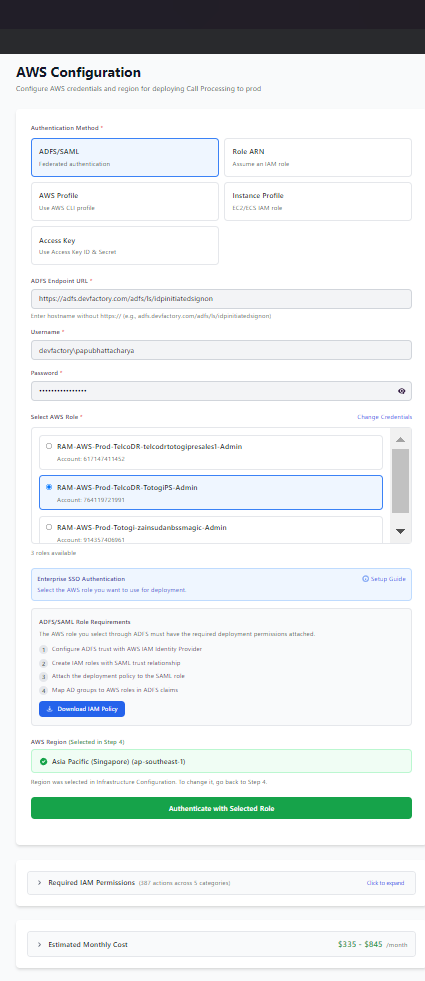
Authentication Options: - IAM Role ARN (recommended for production) - AWS Access Keys - AWS CLI Profile - ADFS/SAML
Click Test Credentials to validate before proceeding.
Step 7: Verify Permissions
The installer will verify all prerequisites:
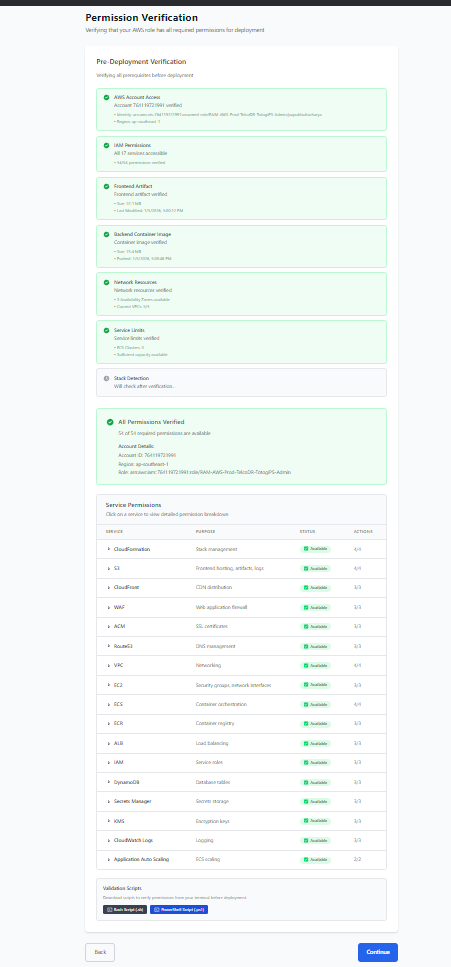
Verification Checks: - AWS account access - Required IAM permissions - Artifact availability - Network resources
All checks must pass (✅) before proceeding.
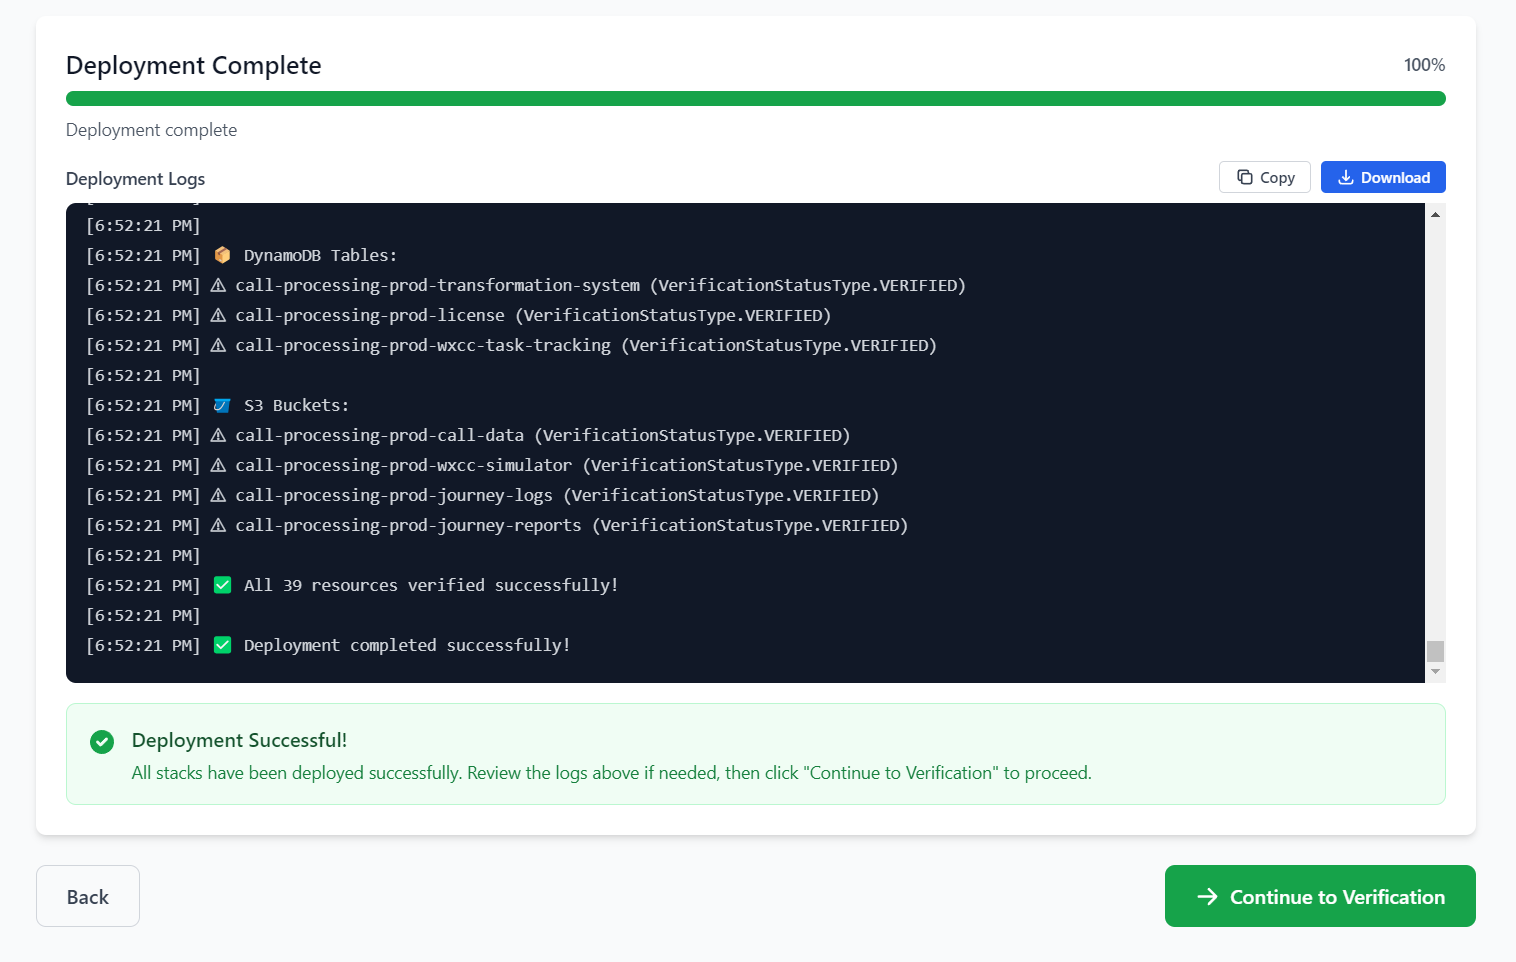
Step 8: Start Deployment
Click Start Deployment and monitor progress:

The deployment screen shows: - Real-time progress bar - Current deployment stage - Live deployment logs
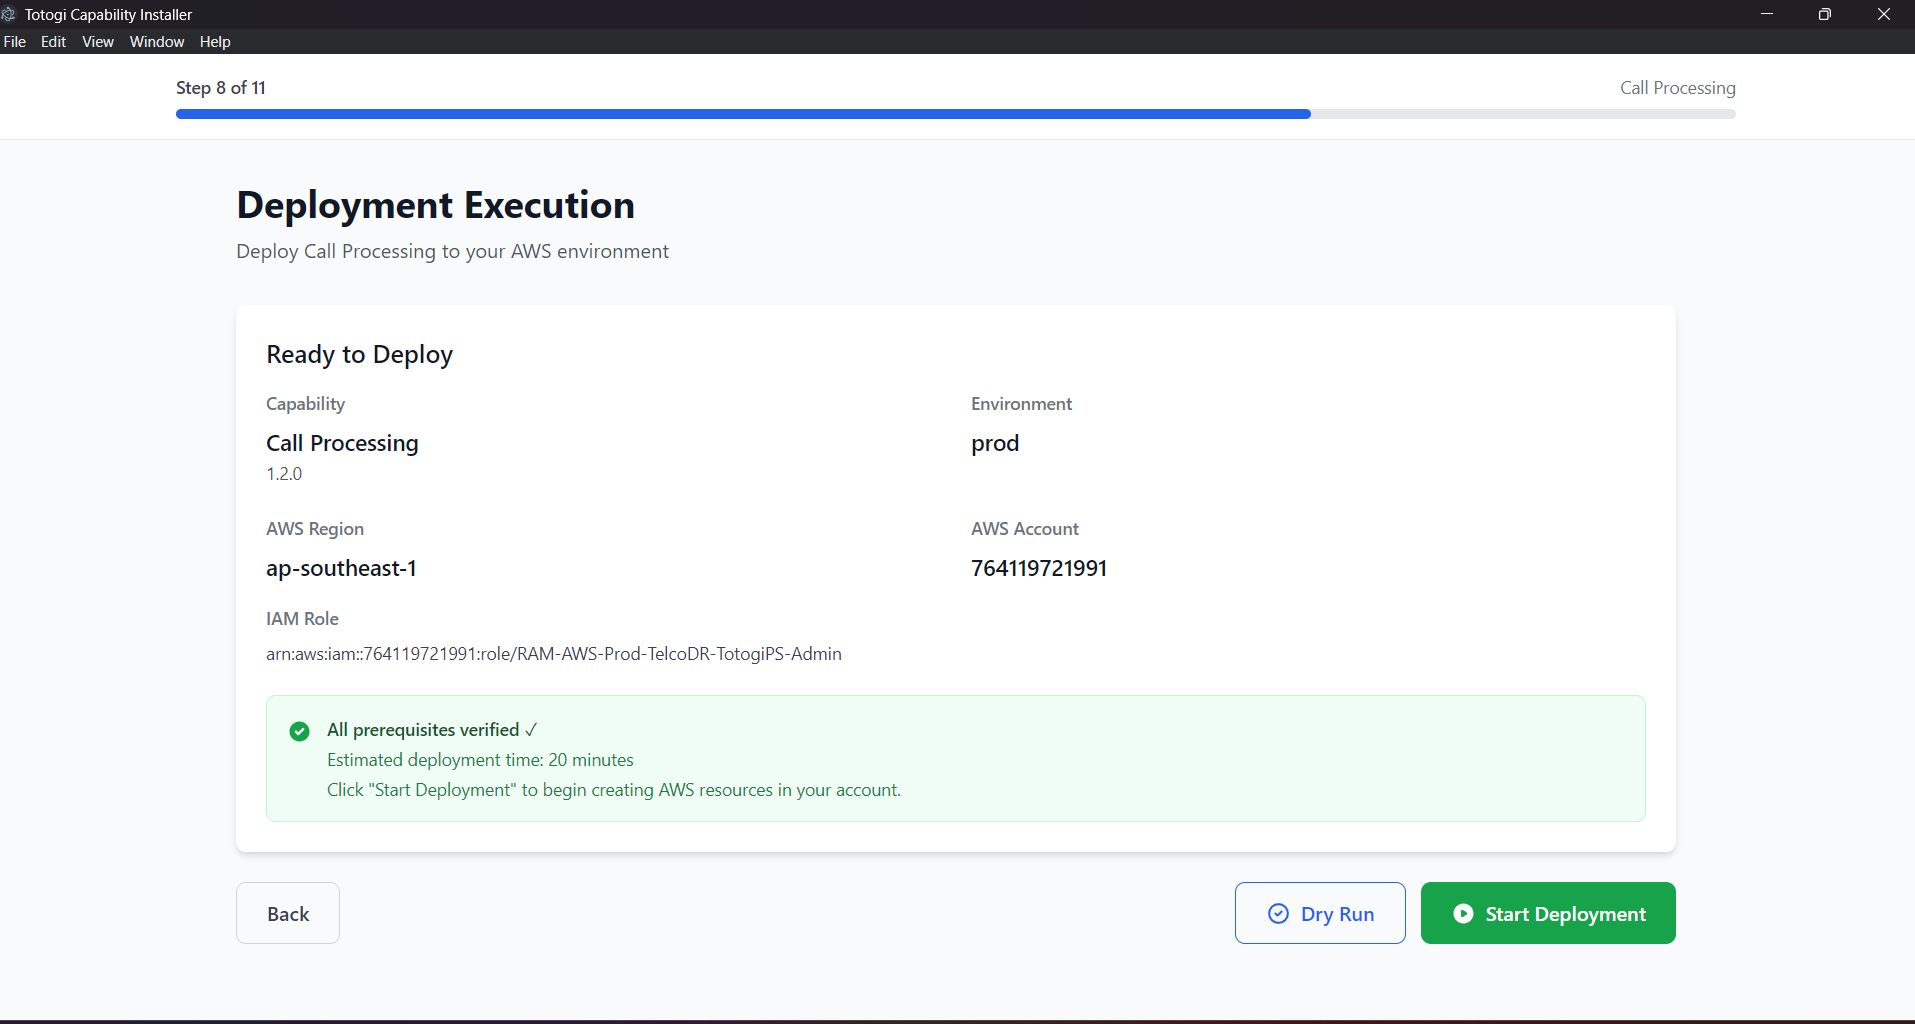
Tip: Deployment typically takes 15-30 minutes. Do not close the application during this process.
Step 9: Access Your Application
Once complete, you'll receive your deployment outputs:
You will receive: - Frontend application URL - Backend API URL - Admin login credentials - Cognito User Pool information
What Gets Deployed?
A typical capability deployment creates resources based on your architecture selection:
Frontend Infrastructure (CloudFront + S3)
- S3 bucket for static assets
- CloudFront distribution for global CDN
- WAF rules for security
- ACM certificate for HTTPS
- Route53 DNS records
Backend Infrastructure - ECS Fargate
- VPC with public/private subnets
- ECS Fargate cluster and services
- Application Load Balancer
- DynamoDB tables
- S3 data buckets
- Secrets Manager secrets
- CloudWatch logs and alarms
- IAM roles and policies
Backend Infrastructure - EKS (Kubernetes)
When using the Kubernetes Operator deployment:
Kubernetes Resources:
- Dedicated namespace ({capability}-{env})
- Frontend Deployment and Service (LoadBalancer)
- Backend Deployment and Service (LoadBalancer)
- ServiceAccount with IRSA annotations
- ConfigMaps and Secrets
AWS Resources (auto-provisioned by operator): - DynamoDB tables for application data - S3 buckets for storage - Glue database and catalog - IAM role with IRSA trust policy - Secrets Manager entries - SSM Parameter Store entries
Operator Components (in nexus-system namespace):
- Nexus Operator deployment
- NexusAICapability CRD
- RBAC roles and bindings
Managing Your Deployments
After your initial deployment, you can manage all deployments from the Installation History:
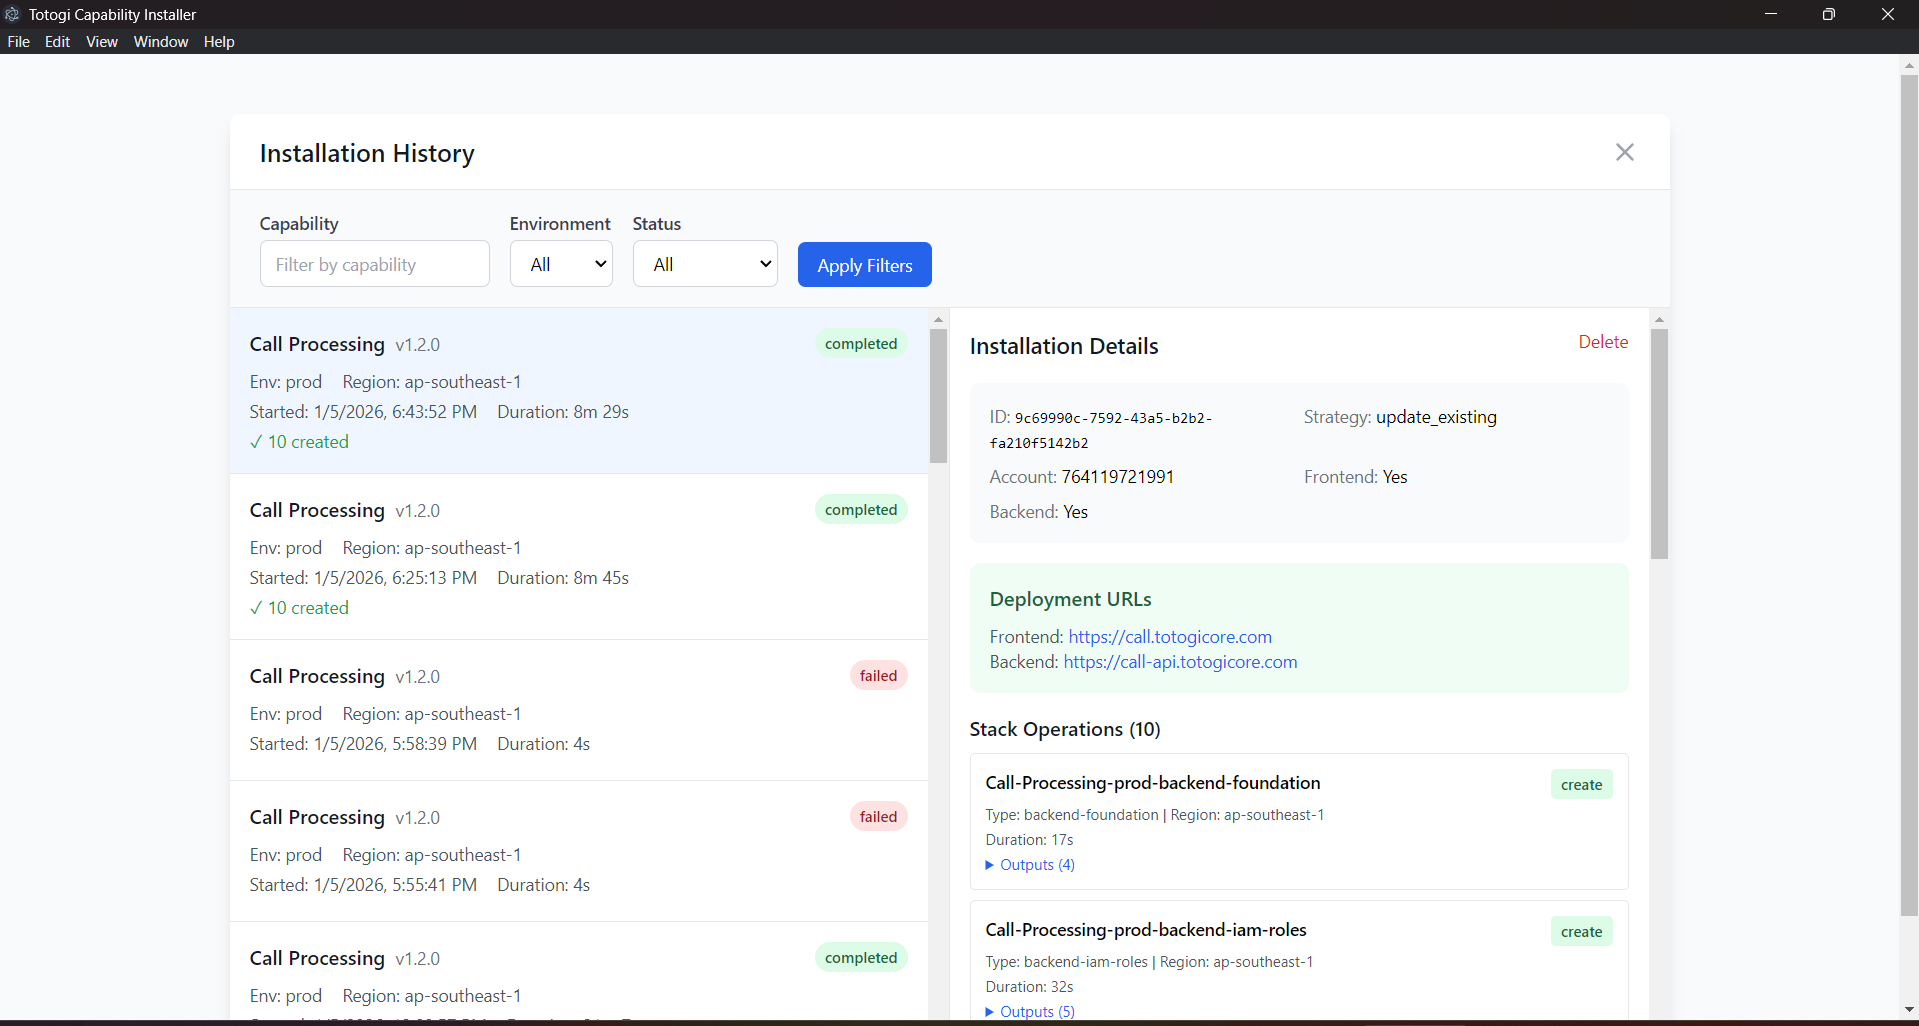
From here you can: - Update existing deployments to newer versions - Delete deployments you no longer need - View Details of any deployment
Next Steps
- Installation Guide - Detailed installation instructions
- Deployment Wizard - Complete wizard walkthrough
- AWS Configuration - AWS setup and permissions
- Managing Deployments - Update, delete, and monitor
- Kubernetes Deployment - EKS deployment guide (for Kubernetes option)